Index
Please watch the following two videos on how to create a Site and a Geofence within the SiteConnect Web Portal:
This video does not reflect the new Sites hierarchy we have developed for SiteConnect so this may look a bit different now.
For more information on this, please see this article
How to create a Site (4:21)
How to create a GeoFence for GPS sign in's (3:25)
If you need further assistance then please read on...
Creating a Site

You can create a new site by going to the Sites menu in the left side menu.
This will show up a list of all of your current Sites you have registered with your account. To create a new Site, click Add.

If you are wanting to create a subsite then click on Subsites to the left of the Site you want to add this to, then click Add once in the subsites menu.
-1.webp?width=623&height=56&name=Sites%20menu%20(1)-1.webp)
This will bring up a list of fields to populate.

These include:
- Site Name
- Location/Address Lookup
- Site Type (Select from drop down)
- Site Status
- Job Number
- Opening & Closing Times
- Site Risk Level
- Short Description of Work (Optional)
Setting up a GPS GeoFence
Go to the Geofence Map tab.

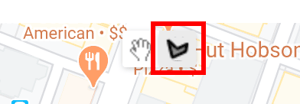 To set up a geofence, click on the "draw a shape" tool in the top center of the map. This will enable drawing mode on the map.

The simplest way to draw a geofence is to click on the four corners of the property you want to set the geofence up for. Clicking on the map will plot points for the geofence. Click and do not drag the mouse as dragging will move the map. You are essentially aiming to draw a square on the map which you can adjust afterwards. In order to finish the geofence you will need to click on the first point you plotted to close the loop.
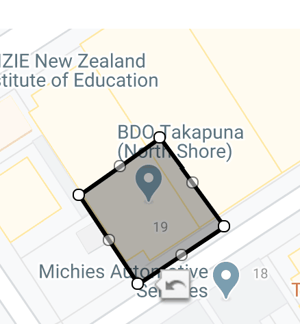 When the "draw a shape" tool disappears from the map, you have successfully set up a geofence. The geofence will have handlers in the form of small circles that you can then click and drag to adjust the geofence.
When drawing geofences, you want to draw them large enough to cater for GPS-drifting. See our GPS-drifting troubleshooting guide for more info around GPS-drifting.
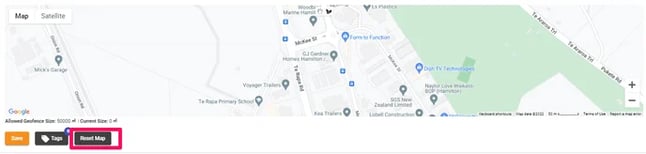
At any time if you made a mistake, you can start again by clicking on the reset map button below the map. This will remove the geofence and/or any plotted points and reenable the drawing tool.
We recommend that the minimum size of your geofence is 3000 square metres and you are allowed to draw a maximum geofence size of 50000 square meters. If a larger geofence size is needed, you can get in touch with the SiteConnect support team support@siteconnect.io to increase the allowable size.
You can also toggle between map and satellite modes if you prefer to look at satellite views.
Press the Save button when done. You can also Reset the map if you make a mistake when drawing the GeoFence.
Now go to the Settings tab

In this tab you can:
-
Enable or disable After-hours notifiations
-
Turn on Site Entry Proximity Alerts for manual GPS sign ins - Click here for more information on manual GPS sign ins
-
Enable or disable Auto site sign-out when you have multiple QR codes on a site
-
Enable or disable your sign out zone or change the sign out zone radius buffer
-
Change your Site Access options to determine what users who are not connected to your account get to see.
-
Turn the Site Risk Assessment level on so it shows in the app
DON'T FORGET TO CLICK ON SAVE WHEN YOU MAKE ANY CHANGES
Once you have complete the Overview, Geofence Map & Settings tabs you will see additional tabs to the right where you can enter further information for the site.

From this menu you will be able to manage the following:
- Noticeboard- create a noticeboard message that is displayed when a user signs into Site. For more information.
- Contractors (Sub SSSP's)- view and add any related contractor companies for this site and also view/add any site specific SSSP documents that the contractor has provided.
- Managers- add Site Managers to this site from your employee list which allows them to manage the hazars & risks and hazardous substances in the app as well as view onsite users.
- Users Worked On - Any users who have signed into this site will be displayed here. You can also add any Users to this menu by clicking Add User.
- Main SSSP- create a primary SSSP which will be exported into a Zip folder.
- Forms - Any Site forms that you have created and assigned to this site will be displayed here.
- QR Codes - Create and associate QR codes to this site so that users can scan these either with the SiteConnect Mobile App or their phone camera and sign in or out of Site
- Documents - Any site specific documents can be added here and become visible to anyone signed into Site using the Mobile App
- Hazards & Risks - any Hazards/Risks associated with this site will be visible here and within the SiteConnect Moblie App. You can also add Hazards from your account's overall Hazard register.
- Hazardous Substances - any Hazardous Substances associated with this site will be visible here and within the SiteConnect Mobile App.
- Safety Observations - Any Safety Observations reported for this Project will be visible in this list. You can also add a new Safety observation to this Project from here. For more information please see this article
- Incidents - Any Incidents reported for this Project will be visible in this list. You can also add a new Incident to this Project from here. For more information please see this article
- Toolbox Talks - Any Toolbox Talks that have taken place/recorded within this Project will be visible in this list. You can also add a new Toolbox Talk record to this Project from here. For more information please see this article
- Inspections & Audits - Any Inspections completed for this Project from the mobile app will be visible here and within the SiteConnect Mobile App. For more information please see this article
- Task Analysis Documents - Any Task Analysis documents related to your Project can be added here for anyone to then view when signed into this Project via the Mobile App. For more information please see this article
- TA/JSA/SWMS - Any assigned Task Analysis can be created for this Project and will then be visible on here. For more information, please see this article
- Emergency Evacuation Plans - An emergency evacuation plan can be set up with this option which can then be logged against this site. For more information on this, please see this article
- Notification roles - select who needs to recieve notifications for this site.
If you need any further help or have any questions, please contact your regional support team:
- New Zealand (NZ):
📧 support@siteconnect.io
📞 +64 800 748 763 - Australia (AU):
📧 support@siteconnect.io
📞 +61 1300 637 183 - United Kingdom (UK):
📧 support.uk@siteconnect.io
📞 +44 333 043 5727