Index:
- Creating a CSV document to import Employee Details
- How to import a list of Employees
- How to import your Employees' Details from your CSV document into SiteConnect
- How to export a list of Employees
Please watch the following video on how to import & export Employee details:
Importing & Exporting Employees (4:24)
If you require more assistance after watching then please keep on reading...
Creating a CSV document to import Employee Details
Don't know how to create a CSV file? Please follow this link for instructions
The first thing you will need to do before you can import a list of your Employees is to create a CSV document with the following details:
- Name
- Email Address
- Mobile #
- Country code (must be the country's initials, i.e. NZ not the number, i.e. 09)
- Position
- Address (optional) - Street name & #, Suburb, City, Post Code, Country
Once you have created this CSV document you can then import this document.
How to Import a list of your Employees
To import your CSV document listing your Employees you need to go to the Employees module by clicking on Employees on the left-hand side of the main menu.
Once you have clicked on Employees the Employees feature will come up with a list of any Employees you have entered into your system.
At the top of the page you will see an icon button called Import. Click on this button.

The below dialog box will appear asking you to Select and Upload the CSV file. Click on the Select and Upload CSV File button.
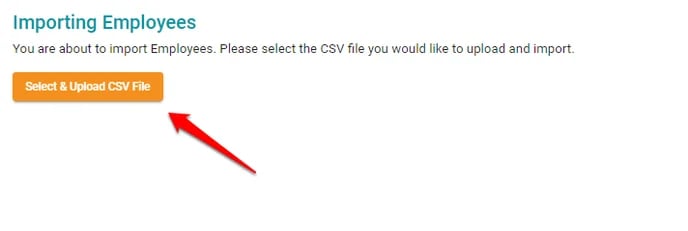
You will then be able to select your CSV document that you have already created from your files. Once you have selected the applicable file the below dialog box will appear.
How to import your Employees Details from the CSV document into SiteConnect
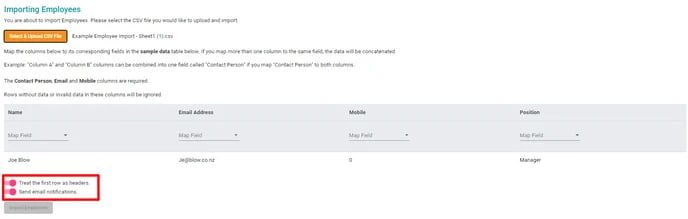
In the bottom left-hand corner you will see a couple of options as follows:
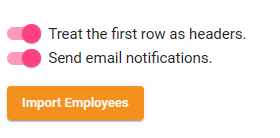
1. Treat the first row as headers - if your CSV document has a header row make sure this button is on pink. If you don't then click on this button to turn it off which will turn it to grey.
2. Send email notifications - you can send email to your employees which will send them their log in details to log in to the system. If the button is pink this means that they will receive the email. If you don't want them to receive the email notification then click on this button to turn it off which will turn it to grey.
The next step is to map the headers from your CSV file to the corresponding columns in the data table.
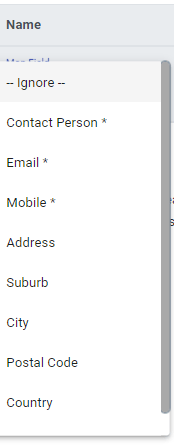
To do this click on each Title one at a time starting with the Name option. Go to Map Field underneath Name and click on the down arrow.
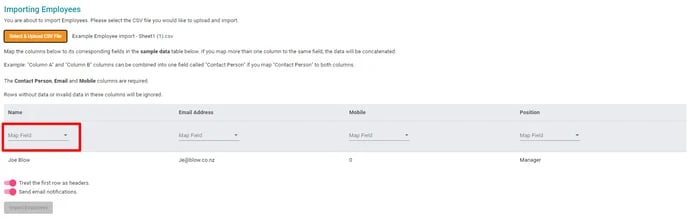
Once you click on the arrow a list will appear which will correspond with the Headers on your CSV document. Pick the Header which corresponds with the Title you are in, which in this case will be Contact Person. Click on Contact Person and this will insert the data against the Name Title.
The compulsory map fields are Name, Email Address and Mobile; the remaining fields are voluntary fields and do not require data if you choose not to populate those fields.
Continue to do this until you have populated all the Title fields. If there is a Title where you don't have any data to import then choose the Ignore option as per example under the heading Trade.

Once you have populated all the Titles click on Import Employees in the bottom left-hand corner.
This will upload your CSV file and import all your Employees' details. You will receive an email from SiteConnect which will look something like this.
How to Export a list of Employees
To export a list of your Employees you need to go to the Employees module by clicking on Employees on the left-hand side of the main menu.
Once you have clicked on Employees the Employees feature will come up with a list of any Employees you have entered into your system.
At the top of the page you will see an icon button called List Menu/Export. Click on this button.

Then click Export All to CSV
.webp?width=150&height=204&name=Exort%20all%20to%20csv%20(1).webp)
The system will generate a CSV file which will list your employees and their details.
Look for this document to appear on your screen usually in the bottom left-hand corner as indicated in this screen shot.
Click on the document to upload the file.
If you need any further help or have any questions please contact the support team by email siteconnectsupport@sitesoft.com or Ph: 0800 748 763