Note: An alternative to generating your own QR codes is for SiteConnect to generate & & print them for you. SiteConnect can provide waterproof QR codes at $5 + GST per code plus courier fee. Please contact the support team by email support@siteconnect.io or Ph: 0800 748 763 to order your QR codes
Index:
QR Codes can also be scanned with your Phone Camera rather than using the SiteConnect Mobile App.
Please watch the following video on creating and managing QR Codes:
QR Codes (4:04)
If you still require assistance then please read on...
Creating QR Codes
Go to the SiteConnect main menu on the left and click on Sites. A list of your sites will appear. Choose which site you want to add QR Codes to and then click on ‘edit’ on the right hand side of the screen.
.webp?width=670&height=60&name=Edit%20projects%20(3).webp)
This will take you to the site concerned. The name of the site will show in the blue on the right-hand side of your screen. Below this you will find a list of tabs. Click on QR Codes.
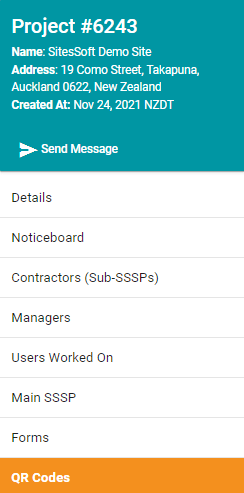
The next screen will give the option to ‘claim a QR Code’ (this is for pre-allocated QR codes generated and printed by SiteConnect - refer to above note) and ‘+ New QR Code’, which is the button we want to click on to create a new QR code.

Click on ‘+ New QR Code’ and a pop-up box will then appear where you enter the name of your QR code and an optional message which the person scanning the QR code will see. You will also need to choose the type of access required which are listed in the instructions on the right-hand side. Click on the save button when done.

Printing a QR Code
This QR Code is then recorded against that site and you will return to the below screen. From here you will then need to print the QR Code. To do this Click on the ‘view’ option on the right hand side of your screen.

The next screen will then come up showing you the ‘type’ of QR code, the name and any message you have added which is what the person scanning in will see. To the right you will see a picture of the QR code itself in plain format and branded format.

If you right click on the QR code you will be given the below options so you can download and print the file.
Updating a QR Code
Should you wish to make any changes to the QR code you can click on ‘edit’ and this will take you back to the below screen where you can make changes to the type, name and message of the QR code.
.webp?width=670&height=218&name=QR%20codes%20form%20(1).webp)
Deleting a QR Code
To delete a QR code go back to the site menu, Select QR Codes, then click on Delete next to the code you want to remove.

This will delete that QR code and it will no longer be active. Deleted QR codes can be restored by SiteConnect Team. Please contact them by email siteconnectsupport@sitesoft.com or Ph: 0800 848 763.
If you want to create additional QR codes for this site, i.e. if you require a different QR code for signing in and one for signing out of the site, then just follow the same process as above but this time creating the QR code for either 'in' or 'out'.
Place the QR code in an easily accessible area, i.e. a site hazard board, site office, reception desk. Make sure you display the correct QR code in the right location.
Selecting settings for users who are not connect to your network
If you do not have the SiteConnect Mobile App downloaded on your Smart Phone you can scan the QR code by using the camera function on your phone. However, the preferred method is still to use the SiteConnect Mobile App.
When signing in without the SiteConnect Mobile App the person who is signing in will not be registered within your network. However, their details will be recorded in the signing in and out records and in the Visitors menu so you will have a record of them being on site.
An administrator for the account will choose the information you get to see when signing in with the phone camera, i.e. you may only be able to see the emergency evacuation plan and the hazard/risks on site.
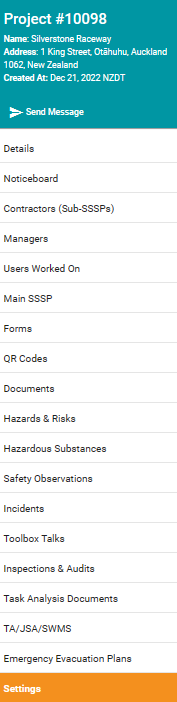
To choose the settings go the Project tab on the Main Menu.
Then go to the Project/Site Menu on the right-hand side of the screen and choose Settings at the bottom of the list.
The below dialog box will appear. Look for Project/Site Access Options and click on the arrow on the right-hand side of the screen.

Once you have clicked on this down arrow you will get three options. Choose the one that is applicable to your organisation.
- Sign-in with acknowledgement - the person signing in will only see the Emergency Evacuation Plan and once they have logged their details they will be prompted to contact the Site Manager.
- Sign-in with acknowledgement and hazards - the person signing in will see the Emergency Evacuation Plan and the hazards associated with that site.
- Sign-in with acknowledgement and all site information - the person signing in will see all information stored to this site.
Reminder: An alternative to generating your own QR codes is for SiteConnect to generate and print them for you. SiteConnect can provide waterproof QR codes at $5 + GST per code. Please contact the support team by email siteconnectsupport@sitesoft.com or Ph: 0800 848 763 to order your QR codes
If you need any further help or have any questions please contact the support team by email siteconnectsupport@sitesoft.com or Ph: 0800 848 763