.png?width=161&height=26&name=SiteConnect%20Logos%20(LinkedIn%20Post).png)
Open Assets in the Web Portal, enter the required information and save the record to the Asset Register.
At a glance
|
For |
Company administrators |
| Platform | Web Portal |
| Applies to | All regions |
| Time to Read | About 3 minutes |
| You’ll learn how to |
• Add an asset. |
Before you begin
Make sure you have permission to manage Assets and have created the Asset Type you want to use.
Step-by-step guide
1. Open Assets
Go to Assets in the Web Portal.
2. Select Add Asset
Select Add Asset.
3. Enter the required details
Fields marked with an asterisk (*) are required. You must complete these fields before you can save the record.
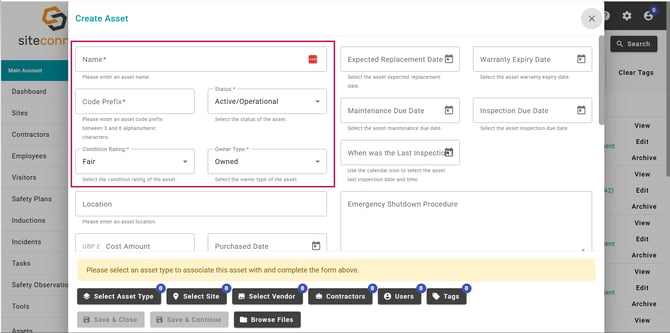
Complete the following fields:
- Name.
- Asset Type.
- Code Prefix using 3–6 letters or numbers.
- Status.
- Owner Type.
- Condition Rating.
The Code Prefix is the 3–6 letter or number abbreviation used at the beginning of the asset’s unique code. For example, entering EXC could create the code EXC-0001. SiteConnect combines the prefix with the asset’s ID automatically. You cannot edit the full code directly, but you can change the prefix if the asset needs a different code.
4. Add optional information
Where relevant, add the site, Asset Subtype, vendor, identifiers, safety information, lifecycle dates, photos and supporting files. You can update these details later.
5. Save the asset
Review the information, then select Save.
Result
The asset appears in the Asset Register with its own unique code and QR code.
Next recommended step
If you did not select a site during setup, link the asset to the site where it is used.
Next article: How do I import assets from a CSV file?