.png?width=161&height=26&name=SiteConnect%20Logos%20(LinkedIn%20Post).png)
Import assets from a CSV file so your existing list is added to the Asset Register together, with Asset Types created automatically if they don't already exist.
At a glance
|
For |
Company administrators |
| Platform | Web Portal |
| Applies to | All regions |
| Time to Read | About 3 minutes |
| You’ll learn how to |
• Download and fill in the import template. |
Before you begin
Make sure you:
- Have permission to manage Assets.
- Have reviewed and created your Asset Types and Asset Subtypes — see What are asset types and subtypes?
SiteConnect can create missing Asset Types and Subtypes during import. Creating them first helps prevent duplicate or inconsistent classifications caused by spelling or naming differences.
Step-by-step guide
1. Open the import tool
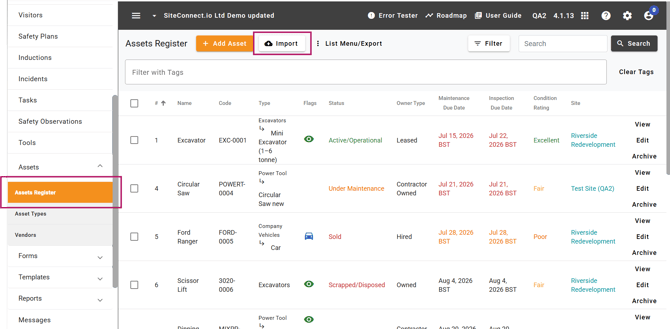
Go to Assets in the Web Portal, then select Import.
2. Download the template
Select Download CSV Template for a correctly formatted starter file.
3. Fill in your rows
Name and Asset Type are the only required import fields. Add optional information such as classifications, identifiers, costs and lifecycle dates where relevant.
The Code Prefix is not required when importing assets via CSV. If you choose to leave this field unmapped, the system will automatically generate a prefix based on the Asset Type. Auto‑generated prefixes are always 6 characters, created from the first three letters of each word in the asset type. Examples:
- Motor Vehicles → MOTVEH
- Plant & Equipment → PLAEQU
If you do map the Code Prefix field in your CSV, the value must be between 3 and 6 characters. Any prefix shorter than 3 characters or longer than 6 characters will be rejected during import.
Use the accepted field values
The Status, Condition Rating and Owner Type fields use predefined values. Enter the wording exactly as shown.
|
Field |
Accepted values |
| Status | Active/Operational Standby Under Repair Out of Service In Storage/Stock Decommissioned Sold Scrapped/Disposed |
| Condition Rating |
Excellent |
| Owner Type | Owned Leased Hired Contractor Owned |
Do not use alternative wording or abbreviations in these fields.
Turn asset settings on
The template includes three Yes/No settings:
- Visible on Mobile app?
- Mobile Asset?
- Safety Critical?
Enter Yes in each column where you want that setting turned on. You can enter Yes in more than one column for the same asset. Leave the cell blank when the setting does not apply.
For example, an asset that needs to appear in the Mobile App and is safety-critical can have Yes under both Visible on Mobile app? and Safety Critical?.
Note
Use a consistent day-first date format, such as DD/MM/YYYY, and check the imported records afterwards. If SiteConnect cannot read a date, the row may still import successfully, but the date is left blank.
4. Upload and map your columns
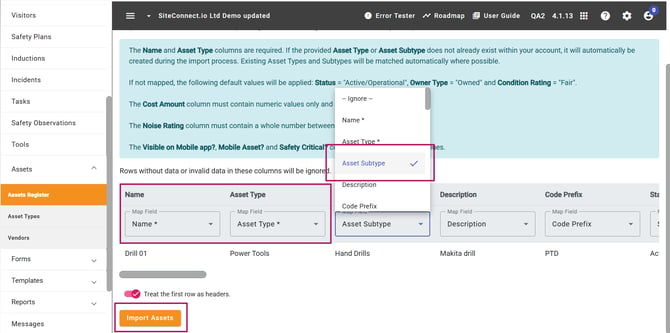
Select Select & Upload CSV File, map each column to the matching field, then select Import Assets.
Result
You’ll know the import is complete when you receive an email showing how many rows were imported or failed, including the reason for each failed row. Imported assets then appear in the Asset Register.
Sites cannot currently be linked through the asset CSV import. After importing, link each asset to the appropriate site.
Next recommended step
Find out how the QR code on each imported asset works.
Next article: How do asset QR codes work?