.png?width=161&height=26&name=SiteConnect%20Logos%20(LinkedIn%20Post).png)
Draw a geofence around your site in the Web Portal so SiteConnect can sign workers in and out automatically as they arrive and leave. Geofence sign-ins use the method GPS, so you can tell them apart from QR code, kiosk and manual sign-ins in site activity reports.
At a glance
|
For |
Company administrators & site managers |
| Platform | Web Portal |
| Applies to | All regions |
| Time to Read | About 3 minutes |
| You'll understand |
• Draw a geofence for a site. |
Before you begin
The site must already be created and saved — the Geofence Map tab only appears once it exists. Workers also need the app installed, contractors must be linked to the site (employees are automatically linked), with location access allowed.
Step-by-step guide
Step 1: Open the site's Geofence Map
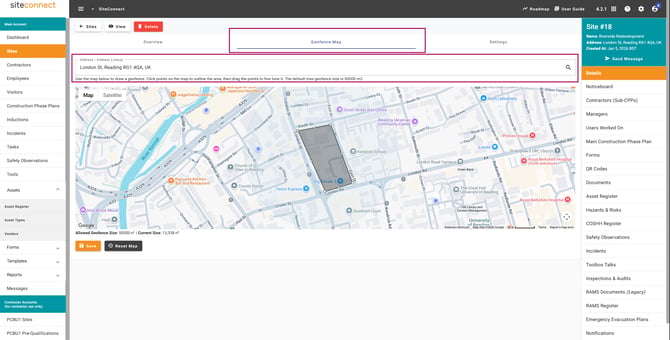
Go to Sites, select the site, then select the Geofence Map tab. Optional: use Address Lookup to recentre the map on the site's address.
Step 2: Draw the boundary
Click points on the map to outline the site. Add at least three points, then select Finish Drawing. Optional: select Reset Map to clear the shape and start again — you'll still need to select Save afterwards.
Step 3: Fine-tune the shape
Drag any point to adjust it, or drag the midpoint between two points to add a new one. Check Current Size against Allowed Geofence Size below the map.
Caution - the default maximum geofence size is 50,000 square metres. Going over it disables Save. Reduce the geofence and save it, then contact support if you genuinely need a larger area.
Step 4: Save the geofence
Select Save.
Result
You will know the task is complete once SiteConnect confirms that the geofence map has been successfully updated and the Geofenced column displays Yes for that site in the Sites list. To review the setup, click View to open the geofence map showing the defined sign‑out boundary. In View mode, you’ll also see any workers currently signed into the site represented as orange dots within the map area.
Scope
This article covers drawing and saving the geofence only. To handle GPS drift, see setting up a sign-out zone.