.png?width=161&height=26&name=SiteConnect%20Logos%20(LinkedIn%20Post).png)
Open the asset's Details tab, select Claim QR Code, enter the printed code's short hash, then confirm to attach it to the asset
At a glance
|
For |
Company administrators |
| Platform | Web Portal |
| Applies to | All regions |
| Time to Read | About 1 minute |
| You’ll learn how to |
• Claim a pre-printed QR code for an asset |
Before you begin
Make sure you:
- Have permission to manage Assets.
- Have the pre-printed code's short hash to hand — it's printed on the code itself.
Step-by-step guide
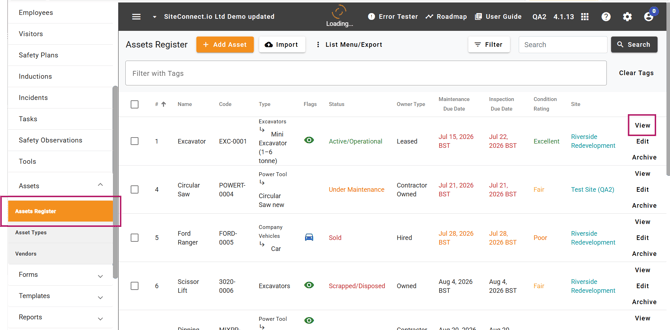
1. Open the asset
Open the asset's Details tab in the Web Portal, where its current QR code is shown.
2. Select Claim QR Code
Select Claim QR Code.
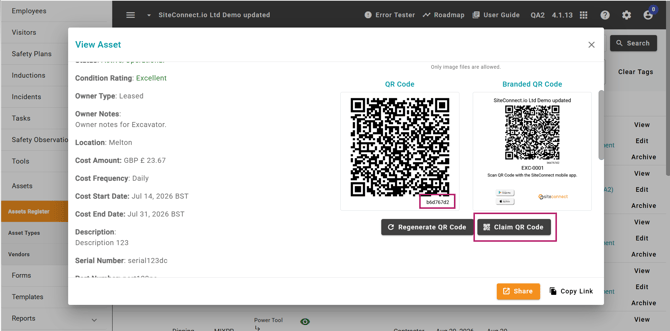
3. Enter the code and confirm
Enter the short hash printed on the code, then confirm to attach it to this asset.
Result
You'll know the task is complete when the asset's QR code updates to the claimed code — scanning it now opens this asset's public page.
Claiming a new code releases the asset's previous one, which becomes an orphaned code for your account. You can only claim codes that are unclaimed or already belong to your account.
Next recommended step
See how the new code behaves when scanned in the Mobile App.
Next article: How do I view assets in the Mobile App?